HOW TO CONNECT TO DYNAMICS 365 ENVIRONMENT WITH OAUTH AUTHENTICATION
Previously, we were applying the Office 365 authentication method to connect to the D365 environment by using the Dynamics 365 URL,
User Name and Password in order to build the connection string and create the CRM Service as per the below sample.
string connectionString = "Url=" + Url + "; Username =" + UserName + "; Password=" + Password + "; authtype=Office365";
CrmServiceClient crmService = new CrmServiceClient(connectionString);
However, Microsoft has announced the deprecation of the Office 365 connection
and declared to connect to Dynamics 365 with Oauth authentication method instead.
In this blog post, I will detail the needed steps that should be followed to connect to the Dynamics 365 environment using the OAUTH authentication.
Below are the three areas we have to configure for the OAUTH Authentication
- Azure to Register App
- Dynamics 365 to create App User
- Visual Studio to connect to the Dynamics 365 using OAUTH Authentication
Steps to do in Azure to Register App
- Access the Azure portal using the link https://portal.azure.com
- Enter the credentials of the Office 365 user
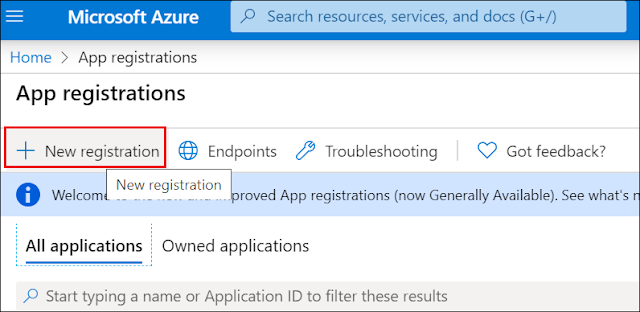
- In the search bar, type Apps Registrations. Click the one listed in the options displayed
-
Click New registration
-
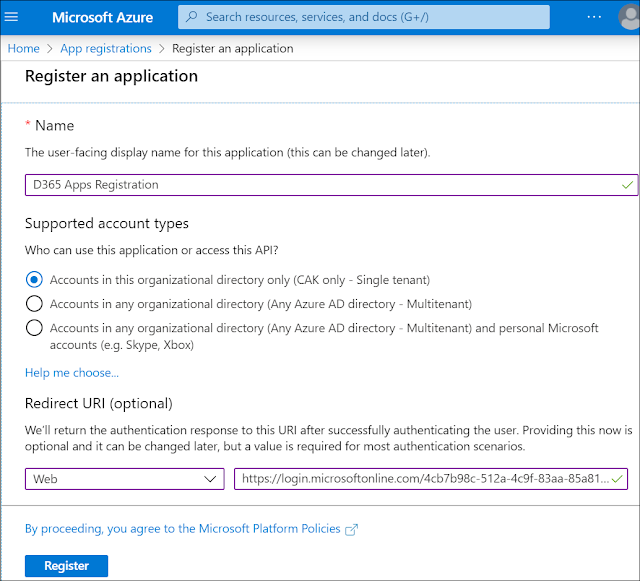
Enter the following info and click Register
- Name
- Supported account types
- Redirect URI (optional)
- In the information page, save the value of the Application (Client) ID field. This value will be used later
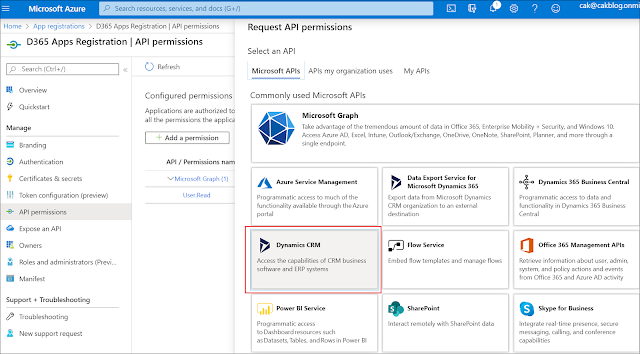
- In the left navigation menu, click API permissions > Add a permission
-
In the new pane choose Dynamics CRM
-
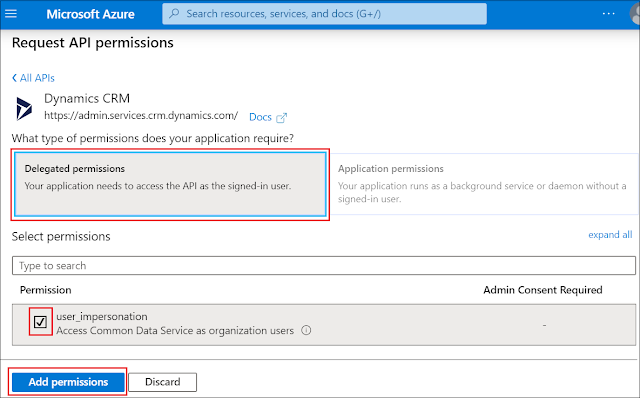
In the new pane
- Choose Delegated permissions
- Check the option user_impersonation
- Click Add permissions
-
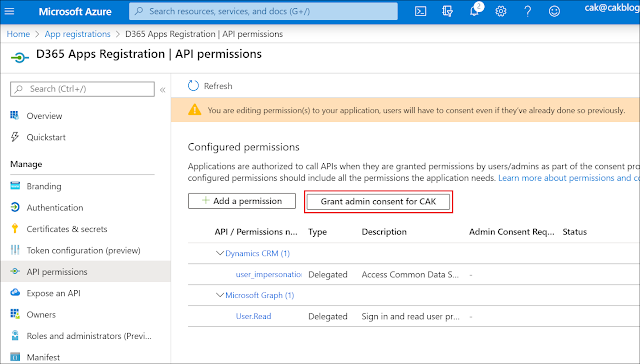
Click Grant admin consent for <yourorganizationname>, and click Yes in the confirmation dialog popup
-
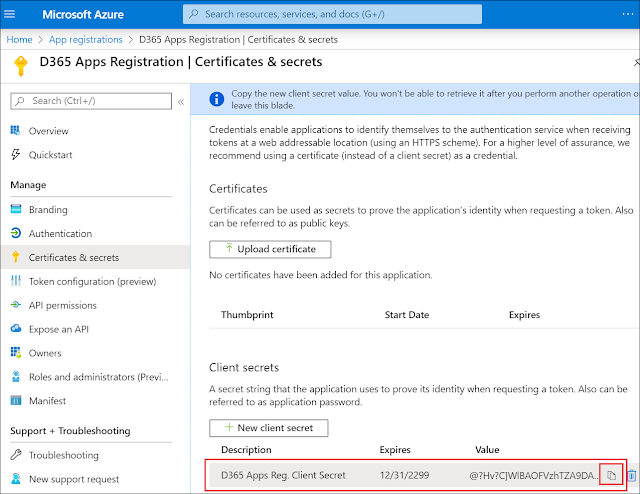
In the left navigation menu, choose Certificates & secrets > New client secret
- In the new pane, select the needed option for Expires and click Add
-
Save the value of the Client Secret generated because the key will be hidden. This value will be used later
-
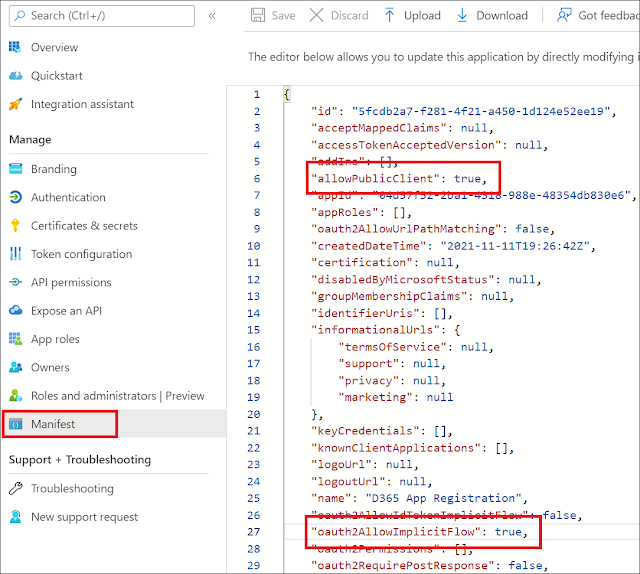
Go to the Manifest menu and set the properties allowPublicClient and oauth2AllowImplicitFlow to true
Steps to do in Dynamics 365 to create App User
- Open the Dynamics 365 environment
- Go to Settings > Security > Users
- Choose the Application Users view
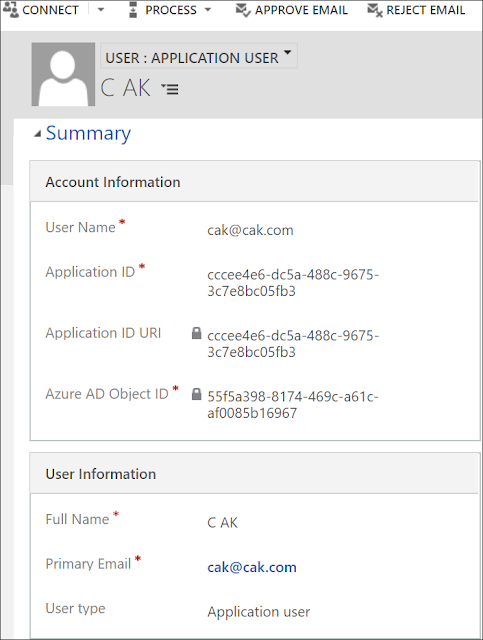
- Click New to create a new user and choose the form named Application User
-
In the new user form
- Enter the value of the User Type field and set it to Application User
- Enter the value of the Application ID field (the one saved in step I.6)
- Enter values for Full Name and Primary Email fields
Steps to do in Visual Studio to connect to the Dynamics 365 using OAUTH Authentication
- Open Visual Studio
- Right click the application project > Manage Nuget packages
- Find and Install the ADAL package (Microsoft.IdentityModel.Clients.ActiveDirectory)
-
In order to connect to D365 with the new OAUTH method, the following configurations are added to the config file:
- WebApi: HTTP REST API giving access to the Dynamics 365 instance. It can be extracted from the developer's resources
- ApplicationID: The value copied from Application (Client) Azure ID (Step I.6)
- ClientSecretKey: The secret key of the Azure client (Step I.13)
- Url: D365 ENV link: https://<organizationname>.crm4.dynamics.com
-
When debugging the code, you can verify that the Service is Ready and can be used
-
Use the snippet of code for GetOrganisationService function
private static CrmServiceClient GetOrganisationService() {
AuthenticationParameters ap = AuthenticationParameters.CreateFromUrlAsync(new Uri(WebApi)).Result;
//Application id and client secret key
var creds = new ClientCredential(ApplicationId, ClientSecretKey);
//Acquire a token
AuthenticationContext authContext = new AuthenticationContext(ap.Authority.Replace("/oauth2/authorize", ""));
var pretoken = authContext.AcquireTokenAsync(ap.Resource, creds).Result;
var token = pretoken.AccessToken;
Uri serviceUrl = new Uri(Url + @"/XRMServices/2011/Organization.svc/web?SdkClientVersion=9.1");
using (var sdkService = new Microsoft.Xrm.Sdk.WebServiceClient.OrganizationWebProxyClient(serviceUrl, false))
{
sdkService.HeaderToken = token;
crmService = new CrmServiceClient(sdkService);
}
return crmService;
}
Bonus Tip:
You can connect to the XrmToolBox using the OAUTH authentication
You can connect to the XrmToolBox using the OAUTH authentication
- Create a new connection wizard
- Check the option OAUTH for the authentication
-
Put the needed info and create the connection
- Application Id (Step I.6)
- Client Secret Key (Step I.13)
- Redirect URI (Step I.5)
Hope This Helps!



Comments
Post a Comment